Automatic data export - import
To setup automatic actions (export of customer and items, and import of new sales orders or fulfillments):
-
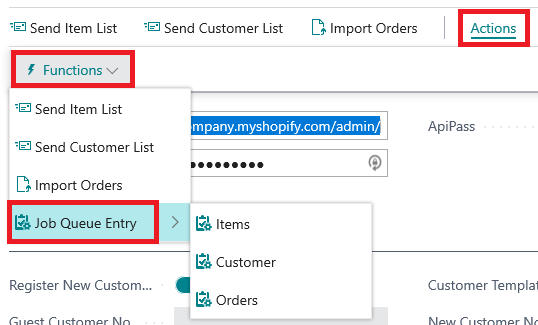
Choose the 🔎 icon, enter Shopify Setup, and then choose the related link.
-
Press Action, then Functions, open group of actions Job Queue Entry
-
Select action then you want to setup as automatic regular job:
-
Items - to sync item list with Shopify (direction depends on Sync Items setting)
-
Customers – to send customer list to Shopify
-
Orders – to import documents from Shopify (orders or fulfillments depending on Import Orders setting)
-
-
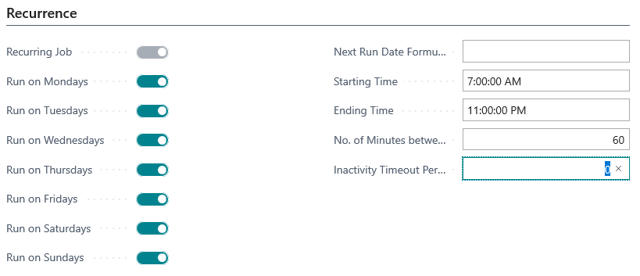
In window Job Queue Entry, select how often job will run, and set status Ready.
-
Set No. of Minutes between Runs = how often job will run (e.g., 15 for every 15 minutes)
-
Or configure a recurring schedule using the Recurrence fields
-
Set Status = Ready to activate the job
-
Job Queue Entry Details
Items Sync Job
Parameter String: SYNC_ITEMS
Behavior:
-
If Sync Items = To Shopify: exports items from Business Central to Shopify
-
If Sync Items = From Shopify: imports items from Shopify to Business Central
-
If Sync Items = Disabled: job does nothing
Typical Schedule: Every 30-60 minutes
Customers Export Job
Parameter String: SEND_CUSTOMERS
Behavior:
-
Exports customers that have Customer Price Group matching WEB Customer Price Group in Shopify Setup
-
Only exports new or modified customers since last run
Typical Schedule: Every 30-60 minutes
Documents Import Job
Parameter String: IMPORT_DOCUMENTS
Behavior:
-
If Import Orders = Orders: imports unfulfilled orders from Shopify as Sales Orders
-
If Import Orders = Fulfillments: imports fulfilled orders from Shopify as Sales Invoices
-
If Import Orders = Disabled: job does nothing
-
Uses Import Orders From DT field to filter orders by date
Typical Schedule: Every 5-15 minutes
Monitoring Job Queue Entries
To monitor and troubleshoot job queue entries:
-
Choose the 🔎 icon, enter Job Queue Entries, and then choose the related link.
-
Find your Shopify job entries (filtered by Job Queue Category Code = SHOPIFY)
-
Check the Status field:
-
Ready - Job is scheduled and will run
-
In Process - Job is currently running
-
On Hold - Job is paused
-
Error - Job failed
-
-
If job status is Error:
-
Select the job entry
-
Press Log Entries to see error details
-
Check Shopify Log Entries for API communication errors
-
Fix the issue
-
Press Set Status to Ready to restart the job
-
Important Notes
-
Job Queue Entry functionality requires that Job Queue is running in your Business Central environment
-
Jobs run with the user credentials of the user who created the job
-
Make sure the user has appropriate permissions for Shopify connector
-
For production use, set Logging Mode = Error Only to reduce database size