Shopify Connect Setup
After installation of Shopify Connect extension into Microsoft Business Central, several setup tasks should be performed:
Shopify Setup
This is general part of setup
-
Choose the 🔎 icon, enter Shopify Setup, and then choose the related link.
-
This will open Setup page:
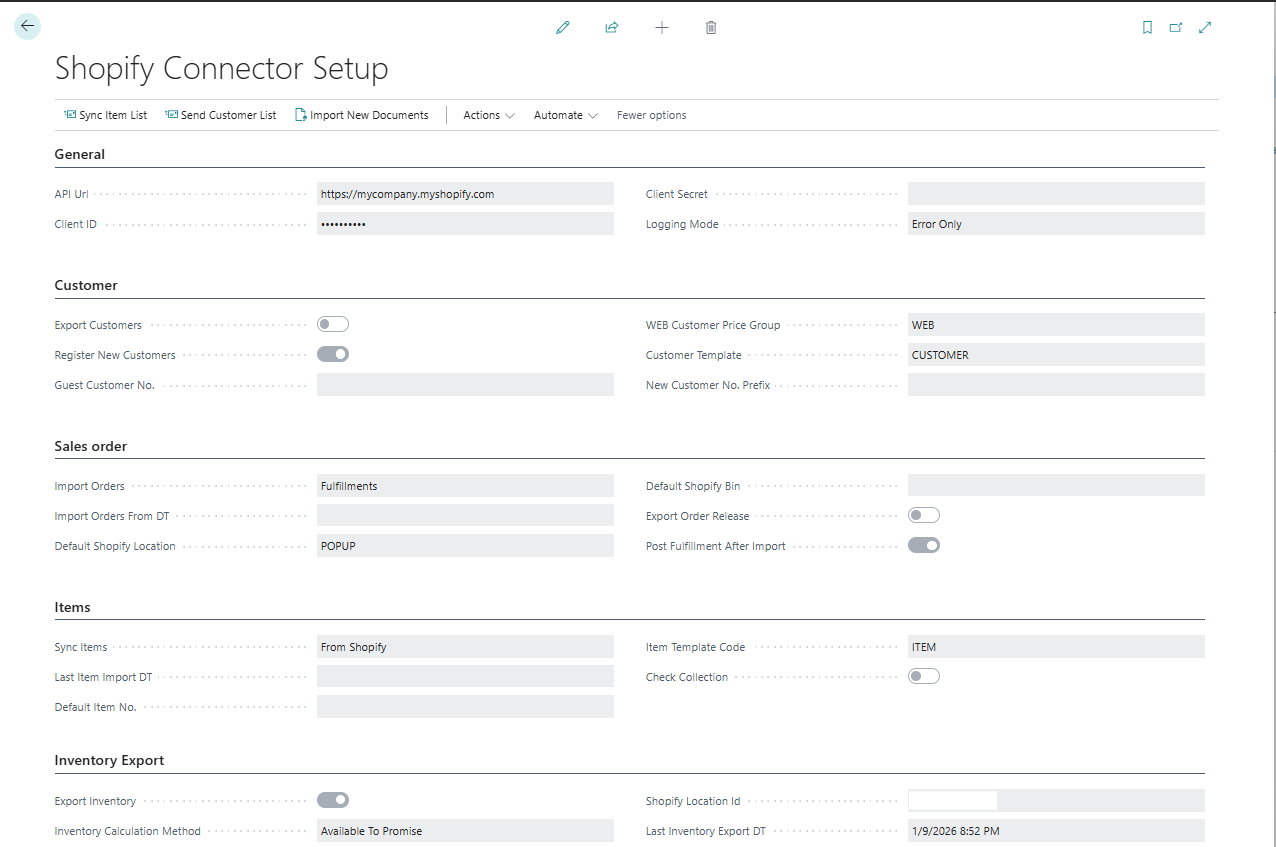
On the General fastTab
-
API Url = address of your Shopify administration page. It should be like https://mycompany.myshopify.com/.
-
Client ID = Client Id from Shopify app. (see section #Create Shopify App and Get Credentials)
-
Client Secret = Client Id from Shopify app. (see section #Create Shopify App and Get Credentials)
-
Logging Mode = Choose logging level:
-
Error Only - Log only API errors (recommended for production)
-
All - Log all API requests and responses (use for troubleshooting)
-
Disabled - No logging
-
On the Customer fastTab
System identifies Shopify sales order customer by searching email address in customer list. User can choose system behavior when it receives order from unknown customer – 1) for every new customer create new Customer Card, or 2) use one generic Customer card (guest customer) to register such sales orders.
-
If user wants that system create use one generic customer:
-
switch-off selector Register New Customer
-
insert that generic customer number in field Guest Customer No.
-
-
If user wants that system for every new customer create new Customer Card:
-
switch-on selector Register New Customer
-
select template code in Customer Template. System will use this template to create new customer data. Please check that template has values in fields Gen. Bus. Posting Group, VAT Bus.Posting Group and Customer Posting Group.
-
Insert prefix in New Customer No. Prefix if you want that new customer number have prefix before number, to separate those customer from other.
-
-
If user wants to send customer information from system to Shopify:
-
select curtomer price group code in Web Customer Price Group
-
in customer data for customers that should be sent to Shopify, set Customer Price Group code same as in Shopify Setup field Web Customer Price Group
-
Warning – when you set Web Customer Price Group in Shopify Setup and in Customer cards, system will automatically send new and updated customers information to Shopify.
On the Sales Order fastTab
-
Import Orders = Choose what to import from Shopify:
-
Disabled - Do not import any orders
-
Orders - Import unfulfilled orders as Sales Orders
-
Fulfillments - Import fulfilled orders as Sales Invoices
-
-
Import Orders From DT = Insert here date&time if you don't want to import orders older than this date&time.
-
Default Shopify Location = insert here location code, that will be used for imported sales orders.
-
Default Shopify Bin = insert here bin code, that will be used for imported sales orders.
-
Export Order Release = Enable this to update Shopify fulfillment status when you release Sales Orders in Business Central.
-
Post Fulfillment After Import = Enable this to post sales invoice aftre fulfillment is imported from Shopify into Business Central.
On the Item fastTab
-
Sync Items = Choose direction of item synchronization:
-
Disabled - Do not synchronize items
-
To Shopify - Export items from Business Central to Shopify
-
From Shopify - Import items from Shopify to Business Central
-
-
Last Item Import DT = Read-only field showing when items were last imported from Shopify.
-
Default Item No. = Fallback item number to use when importing orders if the product cannot be found or created in Business Central.
-
Item Template Code = Template to use when creating new items imported from Shopify. System will use this template's default values for Gen. Prod. Posting Group, VAT Prod. Posting Group, etc.
-
Check Collection = Enable this to verify that items belong to correct Shopify collections based on Item Category mapping.
Create Shopify App and Get Credentials
Important: As of January 2026, Shopify deprecated custom app creation through the Shopify Admin. All new apps must be created using the Shopify Dev Dashboard.
Prerequisites
Before starting, ensure you have:
-
A Shopify account with app development permissions
-
Access to the store where you want to install the app (you need Apps permission)
-
A modern browser (Chrome or Firefox recommended)
Step 1: Create Your App in Dev Dashboard
-
Go to dev.shopify.com/dashboard and sign in with your Shopify account.
-
In the Apps section, click Create app (top-right corner).
-
Select Start from Dev Dashboard.
-
Enter a name for your app (e.g., "Business Central Connector") and click Create.
Step 2: Configure App Permissions
-
In your new app, go to the Versions tab.
-
Click Create version or edit the existing version.
-
For App URL, you can use the default:
<https://shopify.dev/apps/default-app-home> -
Click Release to save your version.
Step 3: Get Your Client Credentials
- In your app, go to Settings (in the left sidebar).
Step 4: Install the App on Your Store
-
Go to your app's Home page in the Dev Dashboard.
-
Scroll down to the Installation section and click Install app.
-
Select the store where you want to install the app.
Step 5: Configure Business Central
-
In Business Central, search for Shopify Setup and open it.
-
Set Logging Mode to your preference:
-
Error Only - Log only API errors (recommended for production)
-
All - Log all API requests and responses (for troubleshooting)
-
Disabled - No logging
-
Step 6: Verify Connection and Permissions
-
On the Shopify Setup page, choose Actions > F&unctions > Test.
-
The system will:
-
Authenticate using your Client ID and Client Secret
-
Obtain an access token from Shopify
-
Verify connectivity to your store
-
Validate that all required permissions are granted
-
-
Success message:
Connection successful! Shop: Your Store Name (your-store.myshopify.com) All required permissions are granted.
Granted permissions: read_all_orders, write_customers, write_inventory, write_orders, write_products, write_assigned_fulfillment_orders, ...
-
Missing permissions message:
Connection successful, but missing required permissions: read_inventory, write_orders
Please update your Shopify app permissions to include these scopes.
If you see this, return to the Dev Dashboard > Versions and add the missing scopes.
-
Connection failed message:
Connection failed. Please verify your Client ID and Client Secret are correct.
Verify that your credentials match those in the Dev Dashboard Settings page.
How Authentication Works
The Shopify Connect extension uses OAuth 2.0 Client Credentials Grant flow:
-
When Business Central needs to communicate with Shopify, it exchanges your Client ID and Client Secret for an access token.
-
Access tokens expire after 24 hours.
-
The extension automatically refreshes tokens before they expire - you don't need to do anything manually.
-
Tokens are securely stored and never exposed in logs or error messages.
Troubleshooting
| Problem
|
Solution
| | --- | --- | |
"403 Forbidden" when installing app
|
You need Apps permission on the store. Contact the store owner.
| |
"Invalid API key or access token"
|
Verify Client ID and Client Secret match the Dev Dashboard exactly.
| |
"Connection failed" after working previously
|
Your token may have expired. Click Test to refresh.
| |
Missing permissions
|
Go to Dev Dashboard > Versions, add required scopes, and release a new version.
|
Item Export Setup
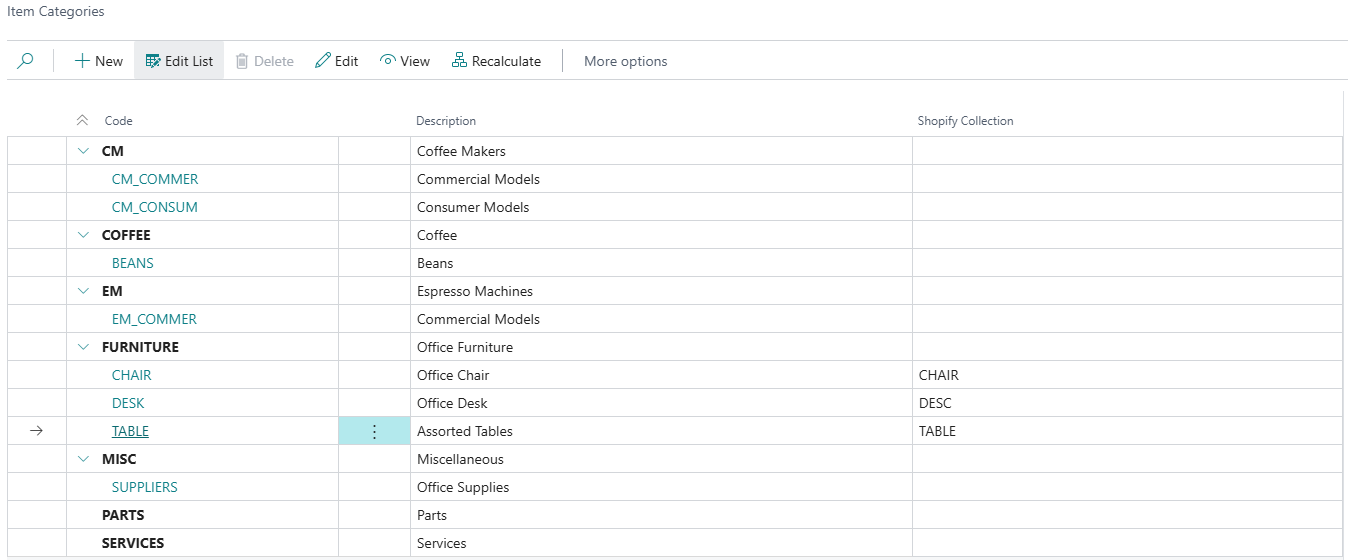
If Check Collection is selected in Setup, before exporting Items from system to Shopify product list, user must
-
create/update Item Categories list in system and
-
create/update Collections list in Shopify.
Item will be exported to Shopify only if item is applied to Item Category that exists in Collection list in Shopify.
-
Choose the 🔎icon, enter Item Categories, and then choose the related link.
-
Code = code of Item Category, ex. CHAIR
-
Description = description of category, ex. Office Chair
-
Set Shopify Collection name as it will be set in Shopify
-
Choose the 🔎 icon, enter Items, and then choose the related link.
-
For each Item, that will be exported to Shopify, open Item Card, and select value in filed Item Category Code
-
Choose the 🔎 icon, enter Items, and then choose the related link
-
For each Item, that will be exported to Shopify, open Item Card, and select value in filed Item Category Code

-
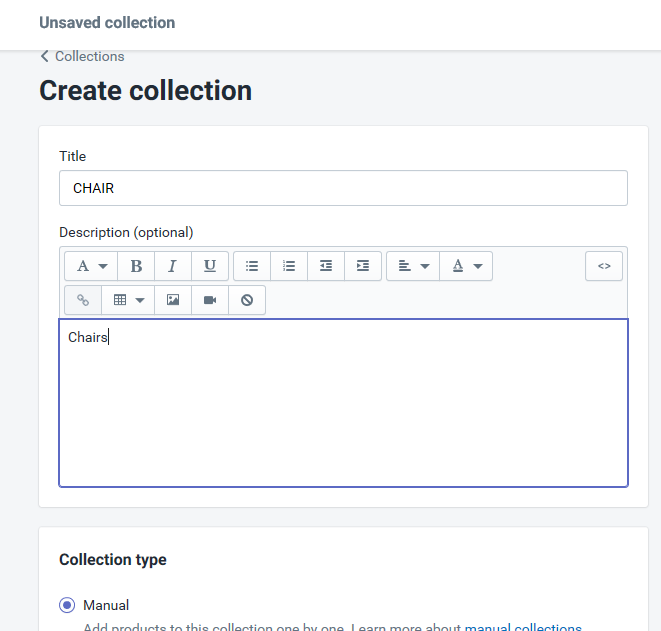
In Shopify Admin page, create list of equivalent collections
-
Open collections webpage, https://mycompany.myshopify.com/admin/collections
-
Press Create Collection
-
Title = must be same as system’s Item Category Code of Shopify Collection field in Business Central.
-
Collection Type = must be Manual.
-
Warning – when you set Export Items switch on in Shopify Setup and create Item Category list, system will automatically send new and updated items information to Shopify.
Mapping of fields you can find in section “Items export – fields mapping”.
Note - from Business Central to Shopify will be send list of items together with Item Variants.