Holder Management
Holder Management tracks WHO currently has the asset - whether it's at a Customer location, Vendor custody, or internal Location. Asset Pro maintains complete holder history for audit trails and compliance.
Understanding Holders
What is a Holder?
A Holder is the entity that currently has physical custody of an asset.
Holder Types:
-
Customer - Asset at customer site (sold, on loan, demo, service)
-
Vendor - Asset with vendor (repair, storage, lease)
-
Location - Asset at internal location (warehouse, department, facility)
-
Cost Center - Asset at our cost center (department, facility)
-
Blank - No holder assigned (not yet in circulation)
Holder ≠ Owner
-
Holder = Physical custody ("Where is it?")
-
Owner = Legal ownership ("Who owns it?")
Example: You own equipment (Owner = Our Company), but it's at a customer site for repair (Holder = Customer C-001).
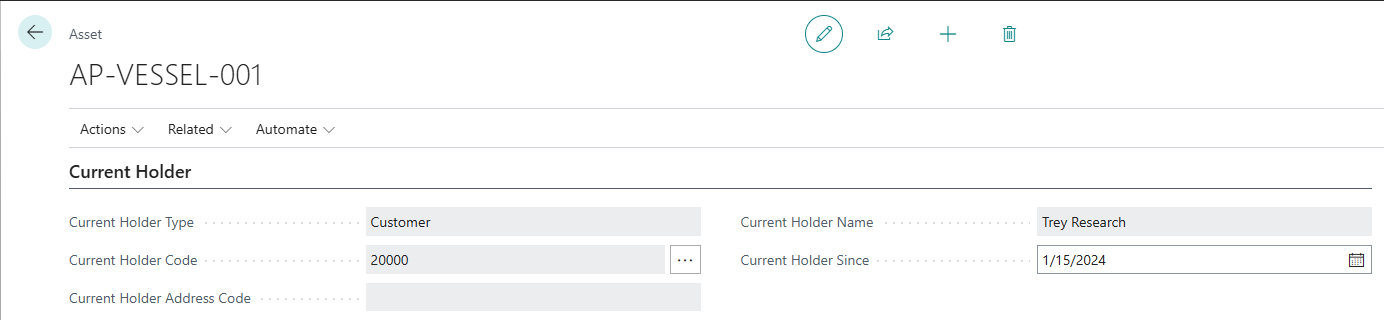
Current Holder Information
Every asset stores its current holder:
Current Holder Fields
Current Holder Type (Enum)
-
The type of holder
-
Options: Customer, Vendor, Location, Cost Center or blank
-
Read-only on Asset Card
Current Holder Code (Code, 20 characters)
-
Specific Customer No., Vendor No., Location Code, Cost Center Code
-
Links to master data
-
Read-only on Asset Card
Current Holder Address Code (Code, 10 characters)
-
Ship-to Address (for Customers)
-
Order Address (for Vendors)
-
Not applicable for Locations
-
Enables tracking to specific customer/vendor address
-
Read-only on Asset Card
Current Holder Name (Text, 100 characters)
-
Name of holder entity
-
Auto-populated from master data
-
Read-only on Asset Card
Current Holder Since (Date)
-
Date when current holder received asset
-
Set automatically on holder change
-
Used for custody duration tracking
Why Current Holder is Read-Only
Audit Trail Requirement:
Current Holder fields are intentionally read-only because:
-
Every holder change creates ledger entry (Holder Entry)
-
Complete custody history must be maintained
-
Compliance and audit requirements
-
Cannot skip custody chain - every change documented
Result: You cannot click and type in Current Holder fields. You must use approved methods.
Three Methods to Change Holders
Asset Pro provides three methods for changing asset holders:
| Method
|
Use When
|
Scope
|
Complexity
| | --- | --- | --- | --- | |
Change Holder Dialog
|
Single asset, quick change
|
One asset
|
Simple
| |
Asset Journal
|
Multiple assets, batch changes
|
Many assets
|
Medium
| |
Document Integration
|
Sales/purchase/transfer posting
|
Automatic
|
Advanced
|
Choose Your Method:
-
One asset, need it now → Change Holder Dialog
-
Multiple assets, batch processing → Asset Journal
-
Posting BC documents → Automatic via Document Integration
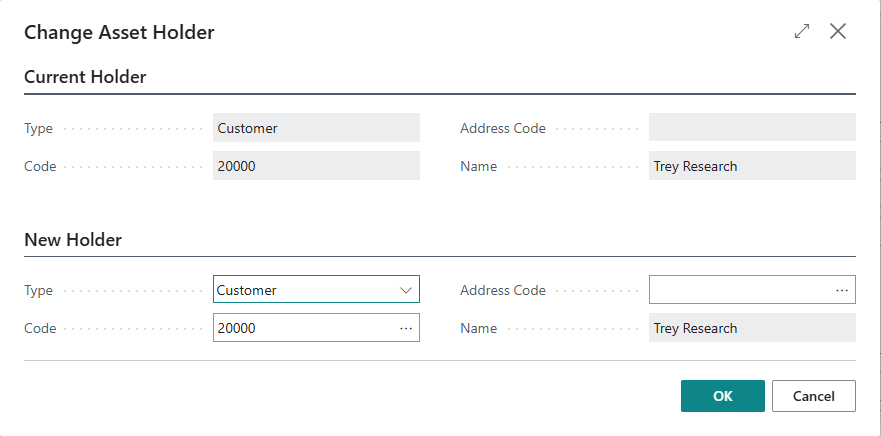
Method 1: Change Holder Dialog
What is Change Holder Dialog?
A quick dialog for changing one asset's holder at a time.
When to Use:
-
Changing one asset holder
-
Quick manual changes
-
Ad-hoc custody updates
-
Simple transfers
When Not to Use:
-
Batch processing (use Asset Journal)
-
Document-driven transfers (use Document Integration)
-
Complex multi-asset moves
Opening Change Holder Dialog
Method 1: From Asset Card
-
Open Asset Card
-
Click Actions → Change Holder
-
Dialog opens
Method 2: From Current Holder Code Field
-
Open Asset Card
-
Navigate to Current Holder Code field
-
Press Alt+↓ (assist button)
-
Dialog opens
Step-by-Step: Changing Holder
Scenario: Move MRI scanner from Vendor (repair) to Location (warehouse)
Step 1: Open Dialog
-
Open Asset Card for MRI scanner
-
Note Current Holder: Vendor V-001 (Repair Shop)
-
Click Actions → Change Holder
-
Dialog shows Current Holder: Vendor V-001
Step 2: Select New Holder Type
-
In New Holder section
-
Type field: Select "Location"
-
Code and Address fields clear
Step 3: Select New Holder Code
-
Code field: Click lookup (Alt+↓)
-
Location List opens
-
Select "WAREHOUSE"
-
Name auto-fills: "Main Warehouse"
Step 4: Address Code (if applicable)
-
Not applicable for Locations
-
Would be used for Customers/Vendors
Step 5: Confirm
-
Review Current vs. New holder
-
Click OK
-
Holder change processed
-
Asset Card updates
Result:
-
Current Holder now: Location WAREHOUSE
-
Holder Entry created (audit trail)
-
Current Holder Since set to today
Change Holder Validation Rules
Rule 1: New Holder Must Be Different
-
Cannot change holder to same holder
-
Example: Cannot change from Customer C-001 to Customer C-001
-
Exception: Can change address code for same holder
Rule 2: New Holder Must Be Specified
-
Type and Code are required
-
Cannot leave blank
-
Must select valid holder
Rule 3: Holder Must Exist
-
Customer, Vendor, or Location must exist in system
-
Lookup validates existence
-
Cannot specify invalid code
Change Holder and Child Assets
Important: Changing parent holder also impacts children
Rule: Assets with parent cannot be transferred separately
Workaround:
-
Detach child from parent
-
Transfer both assets separately to new holder
-
Re-attach child to parent at new holder
Or:
-
Transfer only the parent asset
-
Children automatically follow (future enhancement)
Method 2: Asset Journal
What is Asset Journal?
A batch-processing worksheet for changing multiple asset holders at once.
When to Use:
-
Transferring multiple assets
-
Batch processing
-
Excel import/edit capabilities
-
Regular bulk transfers
-
Scheduled holder updates
Benefits:
-
Process many assets in one posting
-
Review before posting
-
Edit in Excel
-
Document number tracking
-
Reason code assignment
Opening Asset Journal
Method 1: From Role Center
-
Open Asset Manager Role Center
-
Navigate: Transfers → Asset Journal
-
Journal opens
Method 2: Direct Search
-
Press Alt+Q
-
Enter "Asset Journal"
-
Choose related link
-
Journal opens
Journal Batches
Asset Journal uses batches to organize lines:
What is a Batch?
-
Container for journal lines
-
Separate batches for different purposes
-
Example batches:
-
DEFAULT - General transfers
-
MONTHLY - Monthly location transfers
-
REPAIR - Assets to/from repair vendor
-
CUSTOMER - Customer site transfers
-
Managing Batches:
-
Click Batch Name field
-
Press Alt+↓ (lookup)
-
Select existing batch or create new
-
Journal filters to that batch
Creating Batch:
-
Open Asset Journal Batches
-
Click New
-
Name: REPAIR
-
Description: Repair Transfers
-
Save

Asset Journal Fields
Asset No. (Code, 20 characters)
-
The asset to transfer
-
Lookup shows non-blocked assets
-
Restriction: Cannot transfer child assets (with parent)
-
Auto-fills description and current holder on selection
Asset Description (Text, 100 characters, Read-only)
-
Asset name
-
Auto-populated from asset
-
Reference only
Current Holder Type/Code/Address Code (Read-only)
-
Shows asset's current holder
-
Auto-filled from asset
-
Cannot edit (informational)
New Holder Type (Enum)
-
Select holder type: Customer, Vendor, Location
-
Required field
-
Determines lookup for New Holder Code
New Holder Code (Code, 20 characters)
-
Select specific holder
-
Lookup shows valid holders for selected type
-
Required field
-
Validates holder exists
New Holder Address Code (Code, 10 characters)
-
Ship-to Address (Customers) or Order Address (Vendors)
-
Optional
-
Lookup shows addresses for selected holder
Posting Date (Date)
-
When holder change occurs
-
Defaults to WorkDate
-
Used for Holder Entry posting date
Document No. (Code, 20 characters)
-
Reference document number
-
Manual entry or from number series
-
Groups related transfers
Description (Text, 100 characters)
-
Free-form description of transfer
-
Example: "Move to warehouse after repair"
-
Optional but recommended
Reason Code (Code, 10 characters)
-
Reason for holder change
-
Links to Business Central Reason Codes
-
Example: REPAIR, RELOCATION, SALE
-
Optional
External Document No. (Code, 35 characters)
-
External reference (customer PO, vendor invoice, etc.)
-
Optional
-
Useful for cross-referencing
Creating Journal Lines
Step 1: Select Batch
-
Open Asset Journal
-
Select appropriate batch (or use DEFAULT)
Step 2: Add Line
-
Click in first empty line
-
Asset No.: Select asset (or type asset number)
-
Current holder auto-fills
Step 3: Specify New Holder
-
New Holder Type: Customer, Vendor, or Location
-
New Holder Code: Lookup and select holder
-
New Holder Address Code: (if applicable)
Step 4: Add Details
-
Posting Date: Today (or specific date)
-
Document No.: Reference number
-
Description: "Transfer to warehouse"
-
Reason Code: RELOCATION
Step 5: Repeat
-
Add more lines for additional asset transfers
-
All lines in batch posted together
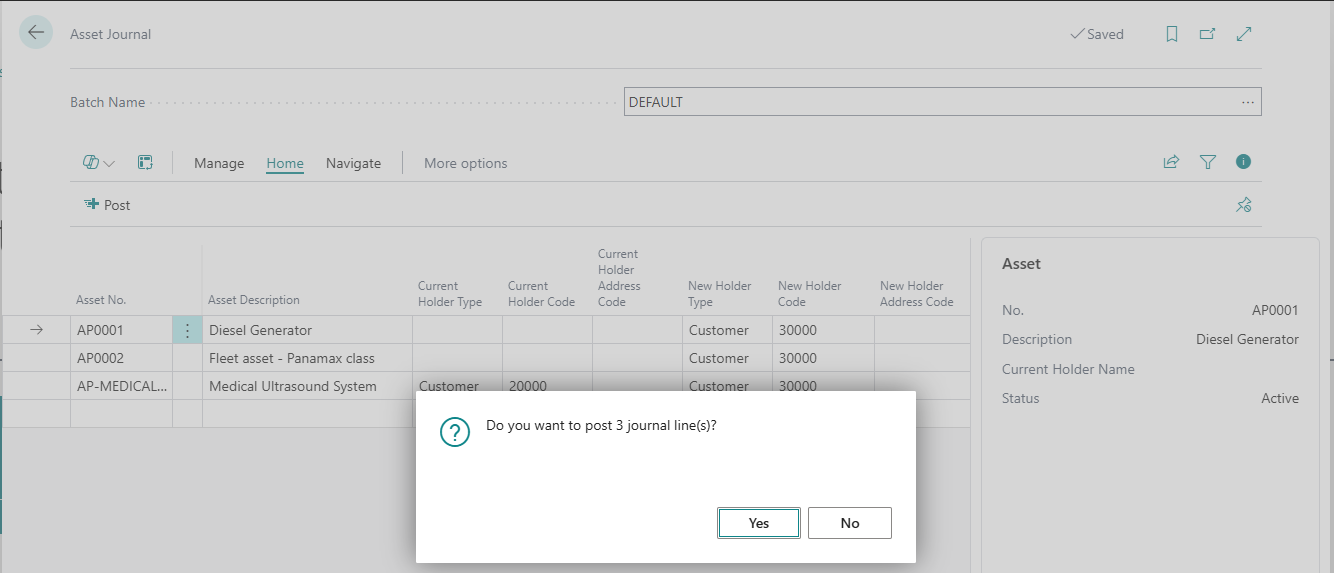
Posting the Asset Journal
How to Post:
-
Review all journal lines
-
Click Post action
-
Or press F9
-
System validates all lines
-
If valid: lines post and clear
-
If errors: error message shown, fix and retry
What Happens During Post:
-
System validates each line
-
Creates Holder Entries (audit trail)
-
Updates Current Holder on each asset
-
Sets Current Holder Since to Posting Date
-
Deletes journal lines
-
Confirmation message
Validation Checks:
-
Asset exists and not blocked
-
Asset is not child asset (no parent)
-
New holder exists
-
New holder different from current
-
Posting date valid
-
No circular transfers
Edit in Excel
Asset Journal supports Edit in Excel for bulk editing:
How to Use:
-
Open Asset Journal
-
Click Actions → Edit in Excel
-
Excel opens with journal data
-
Edit lines in Excel (add, modify, delete)
-
Publish back to Business Central
-
Changes reflected in journal
-
Post as normal
Benefits:
-
Familiar Excel interface
-
Copy/paste from other sources
-
Bulk operations (fill down, formulas)
-
Review in spreadsheet format
Use Case: Transferring 100 assets - easier to manage in Excel
Journal Actions
Post (F9)
-
Post all lines in current batch
-
Validate and create holder entries
-
Clear posted lines
Test Report (Future)
-
Preview posting before committing
-
Check for errors
-
Dry run
Asset (Navigation)
-
Open Asset Card for selected line
-
View asset details
-
Verify current holder
Holder Entries (Navigation)
-
View holder history for selected asset
-
Check past transfers
-
Audit trail
Method 3: Document Integration
Holders can change automatically when posting Business Central documents:
Sales Document Posted:
-
Asset moves from Location → Customer
-
Triggered by Posted Sales Shipment
Purchase Document Posted:
-
Asset moves between Vendor ↔ Location
-
Triggered by Posted Purchase Receipt/Return Shipment
Transfer Order Posted:
-
Asset moves between Locations
-
Triggered by Posted Transfer Shipment/Receipt
See Also: Sales Integration, Purchase Integration, Transfer Integration (in Document Integration section)
Holder Entry (Audit Trail)
Every holder change creates a Holder Entry - permanent audit record.
What is Holder Entry?
Holder Entry = Ledger entry recording asset custody change
Created When:
-
Change Holder Dialog used
-
Asset Journal posted
-
Document with asset posted
-
Initial holder assignment
Cannot Be Deleted: Permanent audit trail
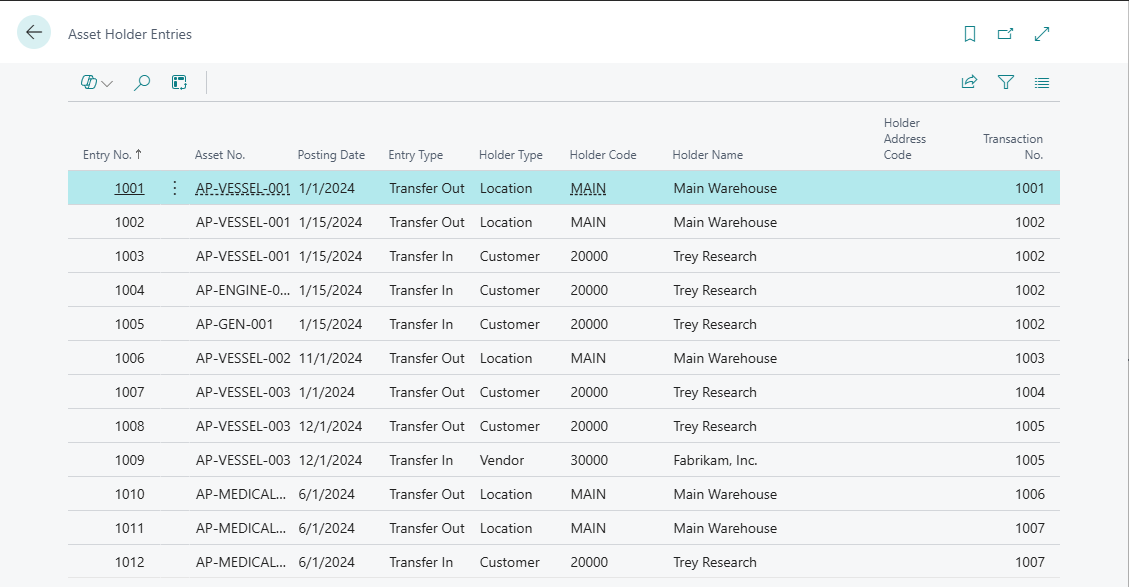
Holder Entry Types
Initial Balance:
-
First holder assignment
-
When asset enters circulation
-
Starting point for holder history
Transfer Out:
-
Asset leaving holder
-
Example: Asset leaving Location WAREHOUSE
-
Paired with Transfer In
Transfer In:
-
Asset arriving at holder
-
Example: Asset arriving at Customer C-001
-
Paired with Transfer Out
Pairing: Transfer Out + Transfer In = One holder change (linked by Transaction No.)
Holder Entry Fields
Entry No. (Integer)
-
Unique entry identifier
-
Auto-assigned sequence
Asset No. (Code, 20 characters)
-
Asset being transferred
-
Links to Asset table
Posting Date (Date)
-
When holder change occurred
-
From journal or document posting date
Entry Type (Enum)
- Initial Balance, Transfer Out, Transfer In
Holder Type/Code/Name (Holder info)
-
Which holder (Customer, Vendor, Location)
-
Specific holder code
-
Holder name at time of entry
Holder Address Code (Code, 10 characters)
-
Ship-to or Order Address
-
If applicable
Transaction No. (Integer)
-
Links Transfer Out/Transfer In pairs
-
Same transaction no. = one holder change
Document Type/No./Line No. (Document linking)
-
Source document if from document posting
-
Asset Journal, Sales Shipment, Purchase Receipt, Transfer Shipment
External Document No. (Code, 35 characters)
-
External reference
-
Customer PO, Vendor invoice, etc.
Reason Code (Code, 10 characters)
-
Why holder changed
-
REPAIR, SALE, RELOCATION, etc.
Description (Text, 100 characters)
-
Free-form description
-
Transfer details
User ID (Code, 50 characters)
-
Who created entry
-
Auto-captured
Source Code (Code, 10 characters)
-
BC Source Code
-
Identifies process that created entry
Viewing Holder History
From Asset Card:
-
Open Asset Card
-
Click Actions → Holder History
-
Holder Entries page opens
-
Filtered to current asset
-
Sorted by Posting Date
From Holder Entries Page:
-
Search for "Holder Entries"
-
Page opens (all entries)
-
Filter as needed
From Asset List:
-
Select asset
-
Click Holder History action
-
Entries for that asset
Interpreting Holder History
Example History:
Entry Date Type Holder Type Holder Code Transaction No.
1 2024-01-01 Initial Bal Location WAREHOUSE 1 2 2024-02-15 Transfer Out Location WAREHOUSE 2 3 2024-02-15 Transfer In Customer C-001 2 4 2024-03-20 Transfer Out Customer C-001 3 5 2024-03-20 Transfer In Location WAREHOUSE 3
Reading:
-
Entry 1: Asset started at WAREHOUSE (Initial Balance)
-
Entries 2-3: Asset moved from WAREHOUSE to Customer C-001 (Transaction 2)
-
Entries 4-5: Asset returned from C-001 to WAREHOUSE (Transaction 3)
Current Holder: Location WAREHOUSE (latest Transfer In)
Holder and Child Assets
Parent-Child Holder Rules
Rule: Child asset must have same holder as parent
Why: Child physically inside parent - cannot be at different location
Validation: System prevents assigning child to asset at different holder
Transferring Parent and Children
Option 1: Transfer Parent Only (Current)
-
Transfer parent asset
-
Manually transfer each child
-
Each child creates separate holder entries
-
Time-consuming for many children
Option 2: Automatic Child Transfer (Future Enhancement)
-
Transfer parent
-
Children follow automatically
-
One operation transfers entire assembly
Current Limitation: Must transfer children manually
Detaching Before Transfer
If you need to transfer child to different holder:
-
Open Child Asset Card
-
Click Detach from Parent
-
Child becomes standalone
-
Transfer child to new holder
-
Transfer parent to different holder (if needed)
-
Optionally re-attach at new location
[Screenshot Placeholder: Detach and Transfer workflow]
Setup Options
Blocking Manual Holder Changes
Administrators can restrict manual holder changes:
Asset Setup → Block Manual Holder Change = TRUE
Effect:
-
Change Holder Dialog disabled
-
Asset Journal still available
-
Enforces document-driven transfers only
-
Use when strict control needed
Use Case: Organizations requiring all holder changes via formal documents (sales orders, purchase orders, transfer orders)
Troubleshooting
Problem: Change Holder Action Not Visible
Cause: Manual holder changes blocked in setup
Solution:
-
Use Asset Journal instead
-
Or contact administrator to enable manual changes
Check:
-
Open Asset Setup
-
View Block Manual Holder Change setting
-
If TRUE, manual changes disabled
Problem: Cannot Transfer Asset - "Asset has parent"
Cause: Asset is child of parent asset
Solution:
-
Detach from parent first
-
Transfer parent and child separately to same new holder
-
Re-attach if needed
Steps:
-
Open Child Asset Card
-
Click Detach from Parent
-
Transfer child via Asset Journal
-
Transfer parent via Asset Journal
-
Re-assign parent on child
Problem: "New holder must be different from current holder"
Cause: Trying to change to same holder and address
Solution 1 (Change address only):
-
Holder Type: Customer C-001
-
Address Code: Change from MAIN to BRANCH
Solution 2 (Actually different holder):
- Select different holder code
Problem: Holder Entry Posted to Wrong Date
Cause: Posting Date incorrect in journal
Correction:
-
Cannot delete or modify posted entries
-
Post correcting entry with correct date
-
Add description: "Correction - actual date [date]"
-
Document in notes
Problem: Asset Journal Line Won't Post - Validation Error
Cause 1: Asset blocked
Solution: Unblock asset on Asset Card
Cause 2: Asset has parent
Solution: Detach from parent or transfer parent first
Cause 3: New holder doesn't exist
Solution: Create Customer/Vendor/Location first
Cause 4: New holder same as current
Solution: Select different holder
The holder history is a complete, permanent audit trail. Always use the proper methods to change holders (Dialog, Journal, or Documents) to ensure this trail remains accurate and compliant. Never try to bypass the system!