Sales Document Integration
Add assets to Sales Orders to automatically transfer custody to customers when posting sales shipments, and receive assets back when posting return receipts.

Understanding Sales Integration
What is Sales Document Integration?
Sales Document Integration = Automatic asset transfer to/from customers during sales document posting
How It Works:
-
Add asset lines to Sales Order (alongside item/service lines)
-
Post Sales Shipment
-
Asset automatically transfers to Customer
-
Holder Entries created
-
Complete audit trail
Business Value: Assets shipped to customers are automatically tracked without separate manual processes
Sales Document Flows
Outbound Flow (To Customer)
Sales Order → Sales Shipment
1. Create Sales Order 2. Add Asset Lines (assets to ship) 3. Post Shipment 4. AUTOMATIC: Asset transfers Location → Customer 5. Holder Entries created 6. Posted Shipment Asset Lines created
Result: Asset at Customer, complete audit trail
Return Flow (From Customer)
Sales Return Order → Return Receipt
1. Create Sales Return Order 2. Add Asset Lines (assets being returned) 3. Post Return Receipt 4. AUTOMATIC: Asset transfers Customer → Location 5. Holder Entries created 6. Posted Return Receipt Asset Lines created
Result: Asset back at Location, complete audit trail
Adding Asset Lines to Sales Documents
Sales Asset Lines Subpage
Sales documents have a separate Asset Lines subpage:
Location: Below main Lines subpage
Purpose: Add assets that will transfer on posting
Fields:
-
Asset No. (required)
-
Asset Description (auto-filled)
-
Quantity to Ship (default 1)
-
Reason Code (optional but recommended)
-
Description (optional)

Step-by-Step: Adding Asset Lines
Scenario: Shipping 3 demo laptops to customer
Step 1: Create Sales Order
-
Create new Sales Order
-
Customer: C-001
-
Add regular lines (if needed)
Step 2: Navigate to Asset Lines
-
Scroll below main Lines section
-
Find Asset Lines subpage
-
Click in first asset line
Step 3: Add First Asset
-
Asset No.: LAPTOP-DEMO-001
-
Asset Description auto-fills
-
Quantity to Ship: 1 (default)
-
Reason Code: DEMO
-
Description: "30-day demo trial"
Step 4: Add More Assets
-
Next line: LAPTOP-DEMO-002
-
Reason: DEMO
-
Next line: LAPTOP-DEMO-003
-
Reason: DEMO
Step 5: Save
-
Sales Order now has 3 asset lines
-
Ready to ship
Asset Line Fields
Asset No. (Required)
Purpose: Asset being shipped to customer
Lookup: Yes (filtered to assets at Ship-from Location)
Validation:
-
Asset must exist
-
Asset must not be blocked
-
Asset must not have parent
-
Asset must be at Ship-from Location
Auto-Fill: Asset Description, Current Holder
Asset Description (Read-Only)
Purpose: Asset name for reference
Auto-Populated: From asset record
Editable: No
Quantity to Ship (Numeric)
Purpose: Quantity to ship (typically 1 for assets)
Default: 1
Range: 0 or 1 (assets are unique)
Use 0: To skip shipping this asset (e.g., customer changed mind)
[Screenshot Placeholder: Quantity to Ship field]
Quantity Shipped (Read-Only)
Purpose: Track shipped quantity
Auto-Updated: On shipment posting
Use: Verify what's been shipped
Reason Code (Optional)
Purpose: Why asset going to customer
Common Codes:
-
SALE - Equipment sold
-
DEMO - Demo/trial equipment
-
SERVICE - Service asset at customer site
-
LOAN - Loaned equipment
-
REPAIR - Customer repair/exchange
Benefit: Enables reporting by reason
Description (Optional)
Purpose: Line-specific notes
Examples:
-
"30-day trial - return by 2024-04-30"
-
"Replacement unit for defective SRV-001"
-
"Service agreement SA-2024-001"
Posting Sales Shipment
Before Posting
Verify:
-
Asset lines added
-
Quantities correct
-
Reason codes set
-
Assets at correct location
Check Ship-from Location:
-
Header "Location Code" field
-
Assets must be at this location
How to Post
Step 1: Post Shipment
-
Open Sales Order
-
Click Post or press F9
-
Select Ship
-
Click OK
Step 2: Automatic Processing
-
BC posts sales shipment (standard)
-
Asset Pro intercepts posting event
-
Creates temp Asset Journal lines
-
Posts journal (creates Holder Entries)
-
Updates asset Current Holder
-
Creates Posted Shipment Asset Lines
Step 3: Confirmation
-
Shipment posted message
-
Posted Shipment No. shown

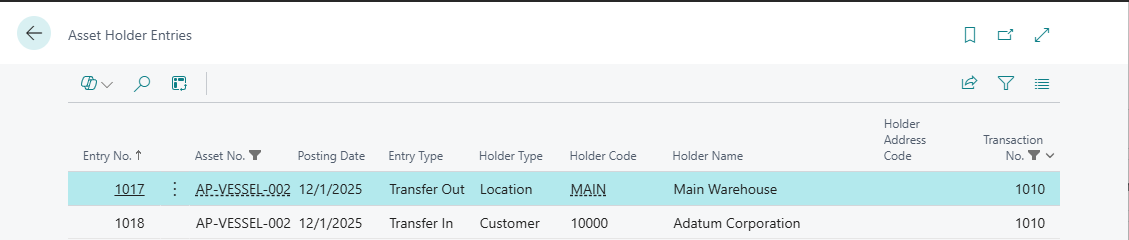
What Happens to Assets
For Each Asset Line:
-
Holder Entries Created:
-
Transfer Out: Location → (leaving)
-
Transfer In: Customer (arriving)
-
Transaction No. links them
-
Document No. = Posted Shipment No.
-
-
Asset Updated:
-
Current Holder Type = Customer
-
Current Holder Code = Sell-to Customer No.
-
Current Holder Since = Posting Date
-
-
Posted Asset Line Created:
-
Posted Shipment Asset Line
-
References asset and shipment
-
Permanent record
-
Undoing Sales Shipment
When to Undo Shipment
Undo Shipment = Reverse a posted sales shipment to return asset to location
Common Scenarios:
-
Asset shipped to wrong customer
-
Shipment posted in error
-
Customer refused delivery
-
Need to modify Sales Order details
-
Asset needs to be reshipped on different order
Important: Undo must happen BEFORE invoicing

How Undo Works
The Undo Process:
-
Validation Checks:
-
Shipment not already undone
-
Asset exists and not blocked
-
Sales Order still exists (not yet invoiced and deleted)
-
Asset currently at customer (holder validation)
-
-
Reversal Steps:
-
Create correction line in Posted Shipment
-
Reverse holder entries (Customer → Location)
-
Update Sales Order line (reduce Quantity Shipped)
-
Mark original line as corrected
-
-
Result:
-
Asset back at original location
-
Sales Order reopened for modification
-
Complete audit trail preserved
-
Step-by-Step: Undoing Shipment
Scenario: Shipment posted in error, need to undo
Step 1: Open Posted Shipment
-
Search "Posted Sales Shipments"
-
Find shipment to undo (e.g., 108001)
-
Open the document
Step 2: Navigate to Asset Lines
-
Scroll to Asset Lines subpage
-
Find asset line to undo (e.g., LAPTOP-DEMO-001)
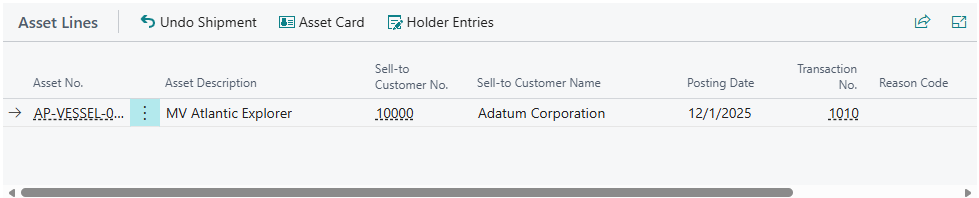
Step 3: Execute Undo
-
Select the asset line
-
Click Undo Shipment action
-
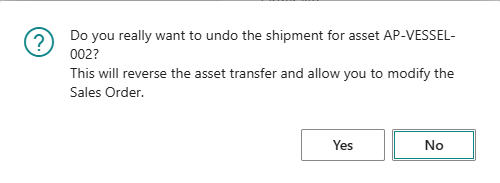
Confirmation dialog appears:
-
"Do you really want to undo the shipment for asset LAPTOP-DEMO-001?"
-
"This will reverse the asset transfer and allow you to modify the Sales Order."
-
-
Click Yes
Step 4: Processing
-
Dialog: "Checking asset shipment line..."
-
Dialog: "Undoing asset shipment..."
-
Message: "Asset shipment undone successfully."
Step 5: Verify Results
-
Posted Shipment: Correction line created
-
Asset Card: Current Holder back to Location
-
Sales Order: Asset line Quantity Shipped reduced
-
Holder Entries: Reversal entries created
What Happens During Undo
Posted Shipment Changes:
-
Original line marked with "Correction" flag
-
New correction line inserted below original
-
Correction line has:
-
Same asset information
-
Reference to original line
-
Today's date as Posting Date
-
New transaction number
-
Asset Changes:
-
Current Holder Type: Customer → Location
-
Current Holder Code: Updated to original location
-
Current Holder Since: Updated to undo date
Holder Entries Created:
-
Transfer Out: Customer (reversing original Transfer In)
-
Transfer In: Location (reversing original Transfer Out)
-
Document No.: SHIPMENTNO-UNDO
-
Linked by new Transaction No.
Sales Order Reopened:
-
Asset line Quantity Shipped reduced by 1
-
Line available for modification
-
Can be reshipped or removed
Validation Rules for Undo
Cannot Undo If:
-
Already Undone:
-
Error: "This asset shipment has already been reversed."
-
Check: Original line has Correction flag
-
-
Asset Blocked:
-
Error: "Asset LAPTOP-001 is blocked."
-
Solution: Unblock asset first
-
-
Sales Order Not Found:
-
Error: "Sales Order SO-001 line 10000 not found. Cannot undo shipment."
-
Cause: Order was invoiced and deleted
-
Solution: Cannot undo after full invoicing
-
-
Asset Not at Customer:
-
Error: "Cannot undo shipment. Asset LAPTOP-001 current holder does not match the shipment customer."
-
Cause: Asset was manually transferred elsewhere
-
Solution: Transfer asset back to customer first, then undo
-
Undo vs. Return Receipt
Two Ways to Bring Asset Back:
Undo Shipment:
-
Use when: Shipment was in error
-
Timing: Before invoicing
-
Effect: Reverses original shipment
-
Result: Sales Order reopened
-
Best for: Corrections, errors
Return Receipt (Sales Return Order):
-
Use when: Legitimate return after delivery
-
Timing: After invoicing (typically)
-
Effect: New return transaction
-
Result: Separate return document
-
Best for: Normal business returns, warranty exchanges
Choose Undo: For immediate corrections before invoicing
Choose Return: For normal business return process
Troubleshooting Undo
Problem: Cannot Find Undo Action
Cause: Looking at wrong page
Solution:
-
Go to Posted Sales Shipment (not Sales Order)
-
Navigate to Asset Lines subpage
-
Select asset line
-
Look for Undo Shipment action
Problem: Undo Button Grayed Out
Cause: Line already undone
Solution: Check if Correction flag is set (line already reversed)
Problem: Holder Mismatch Error
Cause: Asset was manually moved after shipment
Solution:
-
Check Asset Card Current Holder
-
If not at customer, determine why
-
Options:
-
Transfer asset back to customer manually
-
Then undo shipment
-
OR: Accept current state and don't undo
-
Problem: Sales Order Not Found Error
Cause: Order was fully invoiced and deleted
Solution:
-
Cannot undo after full invoicing
-
Use Sales Return Order for return processing instead
-
Undo only works while Order still exists
Best Practices for Undo
Undo Immediately:
-
Don't wait
-
Undo as soon as error discovered
-
Before invoicing
Document Reason:
-
Use Description field on correction line
-
Explain why undone
-
Create audit note
Verify Before Undoing:
-
Check asset really at customer
-
Confirm Sales Order status
-
Ensure not yet invoiced
Communicate:
-
Notify customer if appropriate
-
Update sales team
-
Document in CRM/notes
Alternative to Undo:
-
If asset already moved, consider leaving shipment posted
-
Use manual holder transfer instead
-
Undo is for clean reversals only
Posted Sales Shipment Asset Lines
What Are They?
Posted Shipment Asset Lines = Permanent record of assets shipped
Location: Posted Sales Shipment → Asset Lines subpage
Fields:
-
Asset No.
-
Asset Description
-
Customer No.
-
Customer Name
-
Reason Code
-
Description
-
Posting Date
-
Transaction No. (links to Holder Entries)
Purpose: Document-specific audit trail
Viewing Posted Asset Lines
From Posted Shipment:
-
Search "Posted Sales Shipments"
-
Open posted shipment
-
Scroll to Asset Lines subpage
-
View assets shipped
From Holder Entries:
-
Holder Entry Document No. = Shipment No.
-
Cross-reference to Posted Shipment
Sales Return Orders
Adding Assets to Returns
Scenario: Customer returning demo equipment
Step 1: Create Sales Return Order
-
Create new Sales Return Order
-
Customer: C-001
-
Add regular return lines (if needed)
Step 2: Add Asset Lines
-
Navigate to Asset Lines subpage
-
Asset No.: LAPTOP-DEMO-001 (being returned)
-
Quantity to Receive: 1
-
Reason Code: DEMO
-
Description: "Demo trial ended"
Step 3: Validate
-
Asset must currently be at Customer
-
Asset No. lookup filters to customer's assets
Posting Return Receipt
Step 1: Post Receipt
-
Open Sales Return Order
-
Click Post
-
Select Receive
-
Click OK
Step 2: Automatic Transfer
-
Asset transfers Customer → Location
-
Holder Entries created
-
Posted Return Receipt Asset Lines created
Step 3: Result
-
Asset back at Location (Receive-to Location)
-
Complete return audit trail
Use Cases
Use Case 1: Equipment Sale
Business Process: Selling server to customer
Steps:
-
Create Sales Order for Customer C-HOS-001
-
Add item line: Server (inventory item)
-
Add asset line: Asset No. SRV-001, Reason: SALE
-
Post Shipment
-
Result: Asset SRV-001 at Customer C-HOS-001
Benefit: Asset ownership transfer tracked automatically with sale
Use Case 2: Demo Equipment Trial
Business Process: 30-day demo to prospective customer
Outbound:
-
Sales Order for Customer C-PROSPECT-001
-
Asset Lines: 3 demo laptops
-
Reason Code: DEMO
-
Description: "30-day trial - return by 2024-05-01"
-
Post Shipment
-
Result: 3 laptops at customer for demo
Return:
-
Sales Return Order (after 30 days)
-
Asset Lines: 3 demo laptops
-
Reason Code: DEMO
-
Post Return Receipt
-
Result: 3 laptops back at warehouse
Benefit: Complete demo cycle tracked
Use Case 3: Service Equipment at Customer Site
Business Process: Equipment under service agreement at customer
Setup:
-
Sales Order (service agreement)
-
Asset Lines: 10 servers
-
Reason Code: SERVICE
-
External Doc No.: SA-2024-001
-
Post Shipment
Ongoing:
-
Assets remain at customer for contract duration
-
Holder Entries show where assets are
-
Service team knows equipment location
End of Contract:
-
Sales Return Order
-
Asset Lines: 10 servers
-
Post Return Receipt
-
Assets back at company
Use Case 4: Customer Warranty Exchange
Business Process: Replacing defective asset under warranty
Outbound (Replacement):
-
Sales Order
-
Asset Line: NEW-SRV-002 (replacement)
-
Reason: SALE (or WARRANTY)
-
Description: "Replacement for defective SRV-001"
-
Post Shipment
Return (Defective):
-
Sales Return Order
-
Asset Line: SRV-001 (defective unit)
-
Reason: RETURN
-
Description: "Defective - replaced with NEW-SRV-002"
-
Post Return Receipt
Result: Complete exchange audit trail
Validation Rules
Adding Asset Lines
Rule: Asset must be at Ship-from Location (Sales Order)
Rule: Asset must be at Customer (Sales Return Order)
Rule: Asset cannot be blocked
Rule: Asset cannot have parent (no child assets)
Error Examples:
-
"Asset SRV-001 is at Location WAREHOUSE, but Ship-from is Location DATACENTER"
-
"Asset SRV-001 has parent. Detach first."
Posting Validation
Rule: Quantity to Ship must be > 0
Rule: Asset must still be at correct holder
Rule: No duplicate assets on same document
Reporting
Assets at Customers
Holder Entries Filter:
-
Current Holder Type = Customer
-
Shows all assets at customer sites
-
Group by Customer No.
Use Case: "What equipment does Customer C-001 have?"
Shipments by Reason
Holder Entries Filter:
-
Document Type = "Sales Shipment"
-
Reason Code = "DEMO"
-
Shows all demo shipments
Use Case: Demo equipment tracking
Returns Analysis
Holder Entries Filter:
-
Document Type = "Return Receipt"
-
Date range
-
Shows all customer returns
Use Case: Return rate analysis
Troubleshooting
Problem: Cannot Add Asset - Not in Lookup
Cause: Asset not at Ship-from Location
Solution:
-
Check Sales Order Location Code
-
Check Asset Current Holder
-
Transfer asset to correct location first
-
Then add to sales order
Problem: Asset Not Transferred After Posting
Cause 1: Posted Invoice only (not Shipment)
Solution: Shipment triggers transfer, not invoice
Cause 2: Quantity to Ship = 0
Solution: Set Quantity to Ship = 1
Problem: Asset Lines Subpage Not Visible
Cause: Looking at wrong subpage
Solution: Scroll below main Lines - look for "Asset Lines" header
Problem: Customer Returns - Asset Not at Customer
Cause: Asset was manually transferred elsewhere
Solution: Check Holder Entries, transfer to customer first, then process return
Integration with Other Features
Component Ledger
Sales Line "Asset No." Field: Different from Asset Lines
-
Sales Line Asset No. = Component tracking (items on asset)
-
Asset Lines = Asset custody transfer
Both Can Coexist: Track components AND transfer assets
Asset References
Cross-Referencing:
-
Holder Entry Document No. → Sales Shipment
-
Sales Shipment → Customer
-
Customer PO → External Document No.
-
Complete traceability
Sales Document Integration is the easiest entry point for document integration. Start with demo equipment or service assets to build team confidence, then expand to other scenarios!