Role Center
The Asset Manager Role Center is your command center for Asset Pro - a dedicated dashboard providing quick access to all asset management features, real-time metrics, and navigation.
What is the Role Center?
The Asset Manager Role Center is a specialized Business Central role center page designed specifically for asset management tasks. It provides:
-
Headline Section: Personalized greeting and documentation links
-
Activity Cues: Real-time metrics and key performance indicators
-
Quick Actions: One-click access to common tasks
-
Navigation Pane: Structured menu for all Asset Pro features
-
Embedded Lists: Quick access to assets and transfer orders
Think of it as your Asset Pro homepage - the first thing you see when you log in and the place you return to for navigation.
Accessing the Role Center
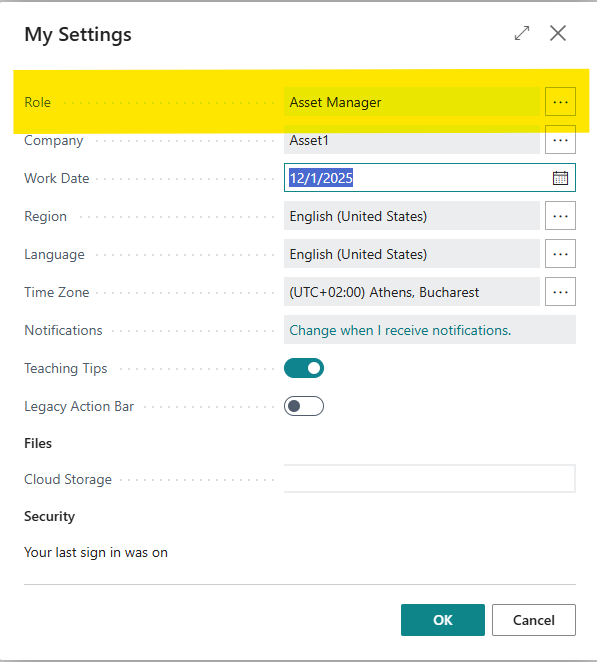
Setting as Your Default Role
To make Asset Manager your default role center:
-
Choose the 🔎 icon
-
Enter My Settings
-
Choose the related link
-
In the Role field, select Asset Manager
-
Click OK
Result: Asset Manager Role Center opens automatically when you log in
Accessing Without Setting as Default
If you use multiple role centers:
-
Click the Settings gear icon (top right)
-
Select My Settings
-
Click Select a Role link
-
Choose Asset Manager from the list
-
Role center opens (doesn't change default)
Or use the search:
-
Choose 🔎 icon
-
Enter Asset Manager Role Center
-
Choose the related link
Role Center Layout
The Asset Manager Role Center is organized into distinct sections:
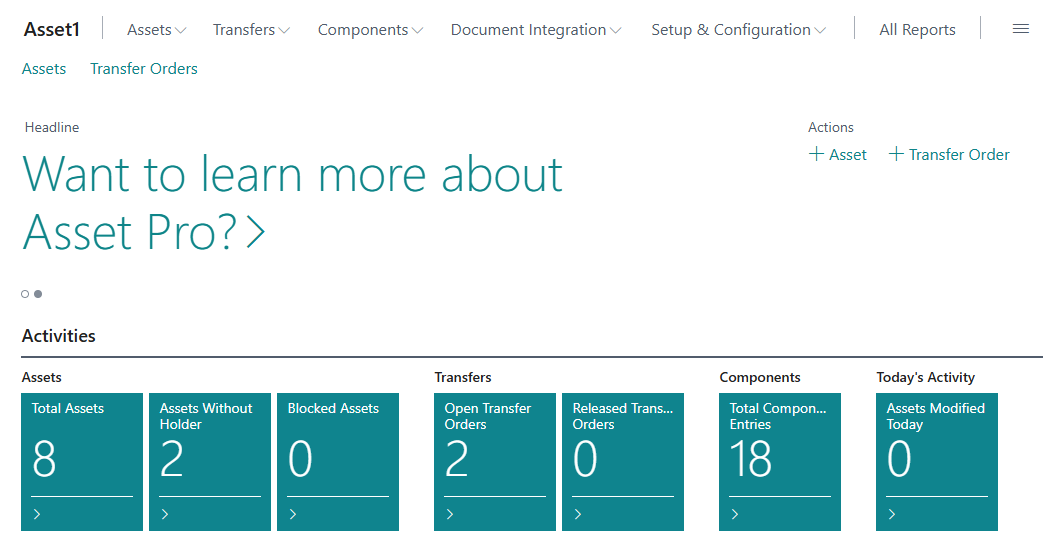
1. Headline Section
Located at the top of the role center, the headline provides:
User Greeting:
-
Personalized welcome message
-
Changes based on time of day ("Good morning", "Good afternoon")
-
Displays your user name
Documentation Link:
-
"Want to learn more about Asset Pro?"
-
Click to open documentation at https://jemel.lv/docs/asset-pro
-
Direct access to help resources

2. Activity Cues (KPIs)
Activity cues display real-time metrics across four groups:

Assets Group
Total Assets:
-
Count of all assets in the system
-
Click to drill down to Asset List
-
Quick overview of system size
Assets Without Holder:
-
Count of assets with no current holder assigned
-
Indicates assets needing assignment
-
Click to view unassigned assets
Blocked Assets:
-
Count of assets marked as Blocked
-
Helps monitor restricted assets
-
Click to view blocked asset list
Quick Action: "New Asset" button creates new asset record
Transfers Group
Open Transfer Orders:
-
Count of transfer orders in "Open" status
-
Orders in draft, not yet released
-
Click to view open transfer order list
Released Transfer Orders:

-
Count of transfer orders in "Released" status
-
Orders ready for posting (shipment/receipt)
-
Click to view released transfer orders
Quick Actions:
-
"New Transfer Order" - Creates new transfer order
-
"Asset Journal" - Opens asset journal for batch transfers
Components Group

Total Component Entries:
-
Count of all component installation/removal entries
-
Complete component activity history
-
Click to view Component Entries ledger
Quick Action: "Component Journal" opens component journal
Today's Activity Group
Assets Modified Today:
-
Count of assets modified on current work date
-
Tracks daily activity
-
Click to view today's modified assets
-
Uses WorkDate() for filtering
Navigation Pane
The navigation pane (left side) provides structured access to all Asset Pro features:
Assets Section
Asset List:
-
View and manage all assets
-
Main asset management page
Asset Tree:
-
Hierarchical tree view of assets
-
Visualize parent-child relationships
Holder Entries:
-
Complete custody history
-
Audit trail of all asset movements
Relationship Entries:
-
Attach/detach event history
-
Parent-child relationship audit trail

Transfers Section
Transfer Orders:
-
View and manage asset transfer orders
-
Open, Released, Posted statuses
Posted Transfers:
-
Archive of completed transfers
-
Posted transfer shipments and receipts
Asset Journal:
-
Batch-based asset transfers
-
Manual holder changes

Components Section
Component Entries:
-
Component installation/removal ledger
-
Complete component history
Component Journal:
-
Record component operations
-
Install, remove, replace components
Document Integration Section
Organized by document type:
Sales:
-
Posted Sales Shipments
-
Posted Return Receipts
Purchase:
-
Posted Purchase Receipts
-
Posted Return Shipments
Quick access to documents that may contain asset lines

Setup & Configuration Section
Asset Setup:
-
Main setup page
-
Number series, feature toggles
Asset Industries:
- Industry configuration
Asset Journal Batches:
- Manage journal batch templates
Component Journal Batches:
- Manage component journal batches
Asset Setup Wizard:
- Launch AI-powered setup wizard
Configuration Packages:
- Import/export configuration packages

Quick Actions Area (Creation)
Located in the top action bar, Quick Actions provide one-click creation:
New Asset
-
Icon: Fixed Assets icon
-
Action: Opens Asset Card in Create mode
-
Use: Create new asset record
-
Shortcut: Fastest way to add new assets
New Transfer Order
-
Icon: Transfer Order icon
-
Action: Opens Asset Transfer Order in Create mode
-
Use: Create new transfer document
-
Shortcut: Start formal transfer process

Embedded Lists Area
The embedded area provides direct access to key lists:
Assets (Embedded):
-
Quick view of asset list without leaving role center
-
Click to open full Asset List page
Transfer Orders (Embedded):
-
Quick view of transfer orders
-
Click to open full Transfer Orders page
Note: Embedded lists show limited records for quick glance. Click to open full pages for complete functionality.
Using the Role Center Effectively
Daily Workflow Example
Morning Check:
-
Log in → Asset Manager Role Center opens
-
Review Activity Cues:
-
Check "Open Transfer Orders" count
-
Check "Assets Modified Today" count
-
Note any "Assets Without Holder" requiring attention
-
-
Click cues to drill down to specific lists if needed
Common Task Execution:
-
Create New Asset: Click "New Asset" in Quick Actions
-
Process Transfers: Click "Released Transfer Orders" cue → Post transfers
-
Record Components: Click "Component Journal" quick action
-
View History: Navigate to Holder Entries or Component Entries
End of Day Review:
-
Check "Assets Modified Today" cue
-
Verify "Open Transfer Orders" status
-
Review any outstanding items
Navigation Tips
Use Activity Cues for Quick Access:
-
Click any cue number to drill down to filtered list
-
Cues are live - refresh automatically
Bookmark Frequently Used Pages:
-
Navigate to page you use often
-
Click bookmark icon (star) in browser
-
Add to BC favorites for quick access
Use Search for Specific Pages:
-
Press Alt+Q or click 🔎 icon
-
Type page name
-
Faster than navigating through menus
Set Role Center as Home:
-
Always returns you to familiar starting point
-
Consistent navigation experience
Customizing the Role Center
Personalizing Activity Cues
Cue Visibility:
-
Right-click on cue group
-
Select "Personalize"
-
Show/hide specific cues
-
Rearrange cue order
Note: Customizations are user-specific (not global)
[Screenshot Placeholder: Personalization menu for cues]
Customizing Navigation
Reorder Navigation Items:
-
Right-click navigation pane
-
Select "Personalize"
-
Drag items to reorder
-
Hide sections you don't use
Add Favorites:
-
Navigate to frequently used page
-
Click star icon to add to favorites
-
Favorites appear in navigation pane
Resetting Customizations
To restore default layout:
-
Right-click role center
-
Select "Personalize"
-
Click "Clear personalization"
-
Confirm reset
Activity Cues in Detail
How Cues Calculate
All cues use FlowFields that calculate in real-time:
Total Assets: Count of all records in Asset table
Assets Without Holder: Count where Current Holder Code = blank
Blocked Assets: Count where Blocked = TRUE
Open Transfer Orders: Count where Status = Open
Released Transfer Orders: Count where Status = Released
Total Component Entries: Count of all Component Entry records
Assets Modified Today: Count where Last Date Modified = WorkDate()
Refresh: Cues update automatically when you navigate back to role center or when RefreshOnActivate triggers
Drill-Down Functionality
Each cue is clickable and opens the relevant filtered list:
Example: Clicking "Assets Without Holder" (showing 5):
-
Click the "5" cue
-
Asset List opens
-
Filtered to show only assets where Current Holder Code is blank
-
All 5 assets displayed
-
You can take action (assign holders, etc.)
This provides actionable metrics - not just numbers, but direct access to the data behind them.
Tip: Pin the Asset Manager Role Center as your browser home page or create a bookmark for instant access. The role center is designed to be your central hub - return to it frequently throughout the day for efficient navigation.